Kids Section


Rudolph shortbread
Prep: 35 mins
Cook: 25 mins
plus chilling
Easy
Makes 8 big biscuits
These simple shortbread triangles are a great edible gift for kids to make over Christmas - decorate with Smarties or other sweets and wrap up with pipe cleaner 'reindeer' antlers
Ingredients
200g salted butter, softened
2 tsp vanilla extract
85g golden caster sugar
85g ground rice
225g plain flour, plus extra for dusting
3 tbsp icing sugar
8 red Smarties
16 white sweets or white chocolate buttons, for the eyes (we used Waitrose Cooks' Homebaking Meringue pieces)
black writing icing tube
You will also need
8 cellophane bags (15 x 25cm) or 8 x 40cm cellophane squares
8 brown pipe cleaners
labels and string or ribbon
22-23cm round plate, cake tin or cardboard template
Method
1. Put the butter, vanilla and sugar in a big mixing bowl and stir together with a wooden spoon until really smooth. Stir in the ground rice first, then the flour. If it starts to get dry, you might need to use your hands to squish everything together to make a smooth dough.
2. Put a piece of baking parchment on a baking sheet. Make the dough into a round ball in the middle of the parchment, then use your hands to push it down and flatten it. Get a rolling pin and dust it with some flour so it doesn’t stick to the dough. Use the rolling pin to roll the dough out to a big circle.
3. Get your 22-23cm round plate, cake tin or cardboard template and place on top of the dough when you’ve rolled it big enough. Use a cutlery knife to trim round the edges to make a neat circle and throw away the trimmings.
4. Use a knife to mark the giant biscuit into 8 smaller wedge-shaped biscuits – pretend you are cutting a pizza into slices but don't actually cut it. Prick lines from the edge to the centre of the dough. Use the back of a fork to press all around the top of the circle along the edge to make a line pattern (it’s going to be hair for your reindeer!)
5. Cover with cling film and put the tray in the fridge for 30 mins to get cold. Heat oven to 180C/160C fan/gas 4. Cook the chilled shortbread for 25 mins until golden. Cool completely on the tray, then use a sharp knife to follow the lines you made with a fork and cut into 8 wedges.
6. Mix the icing sugar with 1-2 tsp of water to make a thickish icing. Dunk each Smartie in and use like glue to stick one on the pointy end of each biscuit to make red noses. Dunk in your white sweets or chocolate buttons and stick them 2cm in from the edge at the other end to be eyes. Use the black writing icing tube to add dots to the white eyes, then let all the icing dry and go hard.
7. Carefully wrap each biscuit in a square of cellophane or put in a cellophane bag. Twist the middle of a pipe cleaner in a loop around the top of the bag or gathered cellophane to enclose the biscuit. Now twist each end of the pipe cleaner so it looks like the reindeer’s antlers. Add labels and give to your friends and family, or hang on the tree. Will keep for up to 3 days in a cool, dry place.

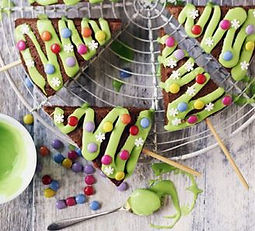
Christmas tree pops
Prep: 1 hr
Cook: 20 mins
plus setting
Easy
Makes 8
Decorate wedges of chocolate sponge with green icing and Smarties to make festive cake pops on sticks - perfect for baking with kids
Ingredients
100g butter at room temperature, plus extra for greasing
100g golden caster sugar
1 tsp vanilla extract
2 medium eggs
100g self-raising flour
3 tbsp cocoa powder
3 tbsp milk
300g icing sugar, sifted
green food colouring
sprinkles, for decorating (we used sugar snowflakes and mini Smarties)
8 lollipop or cake pop sticks, to serve
Method
1. Heat oven to 180C/160C fan/gas 4. Grease a 20cm round cake tin and line the base with a circle of baking parchment.
2. Put the butter in a big mixing bowl with the sugar and vanilla extract, and mix until it looks creamy. Crack in the eggs, one at a time, mixing after each one. Sift the flour and cocoa together, add to the bowl with the milk and stir everything together until smooth. Spoon into the cake tin and use the back of a wooden spoon to spread the top to make it as flat as you can. Bake for 20 mins until a skewer poked into the centre comes out clean, with just cake crumbs stuck to it, not wet batter. Leave the cake to cool completely in the tin on a wire rack.
3. Remove the cake from the tin and use a serrated knife to cut it into 8 wedges. Turn each one so that the round, outside edge is facing you, and push a lollipop or cake pop stick through the middle of the outside edge. Remember to leave enough of the stick poking out for you to hold.
4. Mix the food colouring and icing sugar with enough water to make an icing that is a bit runny, but still quite stiff. Try drizzling a bit on a spare piece of paper; you want it to stay in strips, not run all over the place.
5. Spoon some icing over each cake wedge (you can cover it completely or drizzle lines across them in a tree shape). Decorate with sugar snowflakes and mini Smarties, then lift onto a wire rack and leave to set completely (this will take a few hours). Iced cakes will keep in the tin for up to 2 days. The un-iced cake can be frozen for up to 6 months. Defrost completely before cutting and decorating.
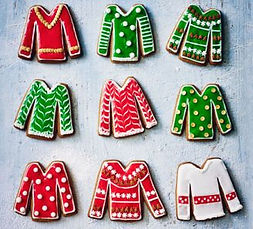
Gingerbread jumpers
Prep: 1 hr
Cook: 10 mins
Moderately easy
Makes 20
Cover these cute gingerbread biscuits with icing and sprinkles in Christmas jumper patterns for a fantastically festive bake
Ingredients
For the gingerbread
175g dark muscovado sugar
85g golden syrup
100g slightly salted butter
350g plain flour, plus extra for dusting
1 tsp bicarbonate of soda
1 tbsp ground ginger
1 tsp ground cinnamon
1 egg, beaten
To decorate
500g fondant icing sugar
food colouring paste in various colours, or use coloured icing tubes (and you won’t need the fondant icing sugar)
sugar sprinkles (optional)
Method
1. Put the sugar, golden syrup and butter in a saucepan. Bring to a simmer, then bubble for 1-2 mins, stirring until well combined. Set aside to cool for 10 mins.
2. Tip the flour, bicarbonate of soda and spices into a large bowl. Add the warm syrup mixture and the egg, stir to bring everything together, then gently knead in the bowl until smooth and streak-free. The dough will feel a little soft now, but will firm up once cooled. Wrap the dough in cling film and chill for at least 30 mins.
3. Remove the dough from the fridge and and leave at room temperature until softened. Heat oven to 200C/180C fan/gas 6 and line two baking trays with baking parchment.
4. Working with half the dough at a time (keeping the remaining dough well wrapped), roll out to the thickness of a £1 coin, keeping the dough in a rough rectangle shape. Cut the dough into long strips, roughly 8cm wide, then cut each strip into ‘jumpers’ (see step-by-step). Cut out a V-neck for the collar and trim slim triangular pieces from either side to create sleeves (see step-by-step). Continue rolling and shaping the dough until you have about 20 jumper shapes. Arrange over the trays and bake for 8 mins until a few shades darker and puffed up a little. Cool on the trays for 5 mins, then transfer to a wire rack to cool completely. Un-iced, the biscuits will keep in a sealed container for up to 2 weeks.
5. For ‘flooded’ biscuits, mix 100g fondant icing sugar with enough water to make a thick but pipeable icing – it should hold its shape when piped. Transfer the icing to a piping bag fitted with a fine round nozzle and pipe a line around the edge of each biscuit. If you have any icing left, tip it back into a bowl and add the remaining icing sugar, then add enough water to make an icing a little looser than the first batch, but not too runny. Divide the icing between as many bowls as the number of colours you’d like to use, then add a tiny bit of colouring to each and mix well until you have a vivid colour.
6. If you have disposable piping bags, transfer the icings to different bags and secure the open ends (see tip).
7. To pipe your jumpers using the 'flooding' method, pipe the runnier icing onto the biscuit, then use a cocktail stick to encourage it to fill every corner up to the piped border. Once dry, you can add details like fluffy collars and cuffs or spots and stripes with the thicker icing.
8. To pipe your jumpers with a cable knit effect, pipe lines of coloured icing (we used white) vertically across the jumper. Use a toothpick to drag up and down through the icing to create a wave effect.
9. Finish off with sugar sprinkles if desired - we used mini gingerbread men, snowflakes, white ‘mimosa’ balls and gold polka dot sprinkles.
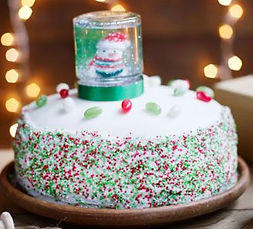
Sparkling snowfetti cake
Prep: 2 hrs
Cook: 3 hrs, 15 mins
plus overnight soaking and drying
Serves 15 - 20
Bring a little magic to your Christmas cake with a simple snow globe and colourful sprinkles - kids will love helping to decorate!
Ingredients
For the cake
225g unsalted butter, softened, plus extra for greasing
225g light muscovado sugar
4 large eggs, beaten
225g plain flour
2 tsp ground mixed spice
zest 1 small orange
Pecan nuts or walnuts, toasted, then roughly chopped
For the fruit
150ml cloudy apple juice
50g unsalted butter
2 tbsp maple syrup
5 tbsp dark rum
800g mixed dried fruit (the kind that includes mixed peel)
175g dried cranberries
To feed the cake (each time)
2 tbsp dark rum
1 tbsp maple syrup
To cover and ice
4 tbsp apricot jam, warmed and sieved
icing sugar, sifted, for rolling out
750g natural marzipan
cooled boiled water or colourless alcohol
750g white sugarpaste (fondant) icing
To decorate
1 large egg white
225g icing sugar, sifted
red, white and green sugar sprinkles (sometimes labelled ‘nonpareils’)
small handful red, white and green jelly beans
For the snow globe
1 medium jar, label removed
1 plastic cake topper (we used a snowman figurine) to fit inside the jar
green or red plastic milk bottle top, if needed
strong glue (not water-based)
green acrylic paint and small paintbrush
2 tbsp glycerine
1 tsp silver craft glitter
festive ribbon, to tie around the jar lid
Method
1. Start with the fruit. Pour the apple juice into a saucepan and bring to a simmer. Add the butter, let it melt, then take off the heat and add the syrup and rum. Put the mixed fruit and cranberries into a large bowl, pour over the hot rum mix, then cover tightly with cling film and leave overnight.
2. The next day, heat oven to 160C/140C fan/gas 3. Grease and double-line a 20cm round, deep cake tin with non-stick baking parchment. Beat the butter and sugar together until creamy and pale, then gradually beat in the eggs until light and fluffy. If the mix starts to split or look lumpy, add 1 tbsp of the flour and keep beating. Sift in the flour, spices and 1/4 tsp salt, and fold in using a large spoon. Fold in the orange zest, nuts, soaked fruit and soaking liquid.
3. Spoon the batter into the tin, level the top, then make a slight dimple in the middle using the back of the spoon. Bake for 1 hr 30 mins, then reduce oven to 140C/120C fan/gas 1 and bake for a further 1 hr 45 mins or until it has risen, is a dark golden colour and a skewer inserted into the middle of the cake comes out clean. Put the tin on a cooling rack and leave until warm.
4. To feed the cake the first time, use a cocktail stick to poke all over the top of the warm cake. Stir together the rum and maple syrup, then slowly spoon over the cake. Cool completely, then remove the baking parchment, wrap loosely in clean baking parchment and store in an airtight tin. Feed the cake every week to 10 days until you decorate it.
5. Now you're ready to cover and ice your cake. Sit the cake on a large flat plate or board and brush a thin layer of apricot jam over the top and sides.
6. Dust the work surface with icing sugar. Lightly knead the marzipan until pliable, then roll out in one direction, turning the marzipan 90 degrees every few rolls and keeping the pressure even. Keep it in a circular shape, reshaping it if needed as you go. When large enough (about 35cm across for a 20cm cake), lift over the cake. Smooth the top and sides with your palms and trim with a knife. If you have time, leave to dry overnight.
7. Clean the work surface and rolling pin. Using a pastry brush, lightly brush the sides with cooled boiled water or alcohol, then cover with the sugarpaste icing, rolling it in the same way. Lift onto the cake, then work your way gradually around, smoothing out any folds with your palms to avoid wrinkles forming. Polish the icing with the palms of your hands (or a proper cake smoother) for a smooth finish. Trim with a sharp knife.
8. Now you're ready to decorate. Make the icing by mixing the egg white and sugar together until thick and smooth. Using a palette knife, spread a thin layer of icing all around the sides of the iced cake. Sit the cake on a large tray and, holding it at an angle, scatter on the sprinkles. You can use a palette knife to help, scooping them up and pressing them on. Leave to dry, then set aside.
9. Sit the cake topper on the jar’s lid, then invert the jar over it. If the figurine looks a little lost in the jar once closed, then glue in the milk bottle top as a booster. When you’re happy, glue the cake topper in place and leave to dry.
10. Use the acrylic paint to paint some simple fir trees on the back of the jar (remember to have it upside down as you paint) and leave to dry.
11. When ready, fill the jar three-quarters full with water, add the glycerine and dissolve. Spoon in the glitter, then screw on the lid and shake well. The glitter will clump a bit at first but then separate. Carefully top up with water if needed, then screw tightly and dry any drips, taking care not to damage your painted trees. Glue the ribbon onto the lid/base of your snow globe.
12. Use a little of the leftover icing to attach the jelly beans to the top of the cake, leaving room for the snow globe. Sit the snow globe on top (you can press it into the icing a little if it seems wobbly) and shake whenever you feel like it!
Snowball dippers
Prep: 20 mins
Cook: 5 mins
plus setting
Makes 10 (easily doubled)
Make a batch of these to dip in warm milk or hot chocolate for a festive party or gathering, or wrap up and give as Christmas gifts
Ingredients
150g bar dark chocolate, broken into chunks
10 fat white marshmallows
white hundreds and thousands
lots of milk, to serve
10 lollipop or cake pop sticks, to serve
Method
1. Bring a pan of water to a simmer over a low heat. Put the chocolate in a heatproof bowl and sit it on top of the pan, making sure that the water doesn’t touch the bottom of the bowl, and gently melt the chocolate.
2. Push a lollipop or cake pop stick into each marshmallow. Check the chocolate is melted completely by giving it a stir, then scrape it into a smaller bowl. Tip the white sprinkles into another small bowl. Put a wire rack next to the bowl of chocolate and a sheet of baking parchment next to the bowl of sprinkles.
3. Holding the end of a stick, dip a marshmallow into the chocolate so that it is completely coated. Lift it out, but hold it over the bowl to allow the extra chocolate to drip back in, then put it on the wire rack. Dunk the marshmallows, one by one, then line them up on the wire rack in the order that you dunked them.
4. Pick up the first marshmallow you dunked and dip into the sprinkles to completely coat. Sit the snowball marshmallow on the baking parchment. Continue to dip and coat the marshmallows, working along the line so that you cover them in sprinkles in the same order that you dunked them in chocolate. When all the marshmallows are covered, leave them on the baking parchment until they are set.
5. You can now wrap the marshmallows in cellophane and tie with ribbons if you’re giving them as a present. Alternatively, if you want to enjoy them right away, warm 1 mug of milk – in a microwave or saucepan – per snowball. Use your snowball as a stirrer in each mug of milk and keep stirring until all the sprinkles, chocolate and most of the marshmallow have melted. Check the milk is not too hot, then drink up. Will keep for up to 2 weeks in cellophane bags.

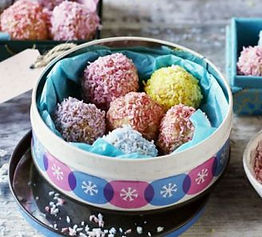
Coconut bauble truffles
Prep: 45 mins
plus at least 2 hrs chilling, no cook
Makes about 20
Make these colourful truffles from leftover Madeira cake, dried apricots and desiccated coconut - perfect as an edible gift to make with kids
Ingredients
250g Madeira cake
85g ready-to-eat dried apricots, finely chopped
25g desiccated coconut
125ml light condensed milk
To decorate
140g desiccated coconut
different food colourings, we used yellow, pink, blue and purple
Method
1. In a big mixing bowl, crumble the cake with your fingers – try to get the bits as small as possible.
2. Tip in the apricots and coconut. Using your hands again, mix together with the cake crumbs. Use a wooden spoon to stir in the condensed milk. After you’ve mixed it in a bit, use your fingers to pull off any bits stuck to the spoon. Squidge everything together with your hands until it is well mixed and all the cake crumbs are sticky. Rub your hands together over the bowl so any bits that are stuck drop off.
3. Line some trays that fit in your fridge with baking parchment. Roll the sticky cake mixture into small balls (about the size of a conker or gobstopper) between your hands. Line them up on the trays, then put them in the fridge while you get the decorations ready.
4. Decide on how many different food colourings you are going to use, then split the coconut into the same number of piles. Put each pile of coconut into a plastic sandwich bag, add a few drops of food colouring to each, and tie a knot in the top. Shake the bags and scrunch between your fingers until all the coconut is coloured – if it’s not bright enough, open the bag and add a few more drops of colouring.
5. Open all the bags of coloured coconut and take the truffles from the fridge. Put 1 tbsp of water in a small bowl and lightly coat each truffle in it so the coconut can stick to the outside of each bauble.
6. One by one, drop each truffle into one of your bags. Shake it and roll it around until the outside is covered in coconut. Carefully put each truffle back onto the trays and chill for at least another 2 hrs until they are really cold and firm.
7. If you like, put some of the truffles in gift bags or boxes and tie with ribbons to give as presents. Will keep in the fridge for up to 1 week.
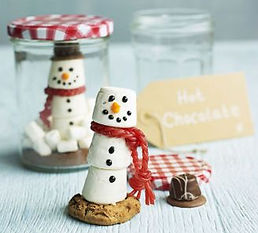
Snow globe hot chocolate
Prep: 20 mins
Serves 1
Marshmallows and strawberry laces transform into a snowman in this cute edible gift idea - a hot chocolate kit in a jam jar - perfect family fun
Ingredients
3 large white marshmallows
icing pens, in black and orange
1 giant chocolate button
1 chocolate - a mini Reese's peanut butter cup or other domed chocolate is perfect
2 tbsp cocoa powder
2 tbsp Horlicks powder
handful mini white marshmallows
1 cookie (small enough to fit in a jam jar)
3 strawberry laces
You will need
1 cocktail stick
1 large jam jar
ribbon and gift tag
Method
1. First make the marshmallow snowman. Skewer the marshmallows together with a cocktail stick - cut off any of the stick that protrudes from the top. Use a little of the icing pen to stick a chocolate button and peanut butter cup to the top of each marshmallow stack, then draw on a face and 3 dots for buttons. Plait 3 strawberry laces and tie around the neck for a scarf. Stick the snowman to a cookie with a little more icing, then set aside to dry for a few mins.
2. Mix the cocoa and Horlicks together in the bottom of your jar. Put the snowman on top, then scatter around the mini marshmallows. Screw on the lid, tie with a ribbon and a gift tag with the following instructions: Warm 300ml milk in a pan. Remove the snowman from the jar and add the milk. Stir until smooth and chocolatey, then enjoy, with your marshmallow snowman for dunking.
Melting snowman biscuits
Prep: 30 mins
Makes 6
Get little ones in the kitchen to assemble these cute festive biscuits - sticky fun for a wintry afternoon.
Ingredients
200g fondant icing sugar
6 white marshmallows
6 large cookies
24 mini chocolate beans
6 pretzel sticks
tube black writing icing
Method
1. Put the icing sugar into a bowl and add cold water a teaspoon at a time until the mixture is runny but thick enough to coat a spoon.
2. Ask an adult to snip the marshmallows in half using wetted scissors.
3. Spoon a little icing onto each cookie and attach half a marshmallow. Using a little icing, stick the other half on top at an angle. Drizzle a little more icing onto the cookie to make melting snow.
4. Break the pretzel sticks in half and place on the cookie for arms. Stick orange chocolate beans on for the noses. Stick three chocolate beans on each cookie to represent buttons.
5. Using the writing icing, pipe small blobs for the eyes and mouth. Leave to set.

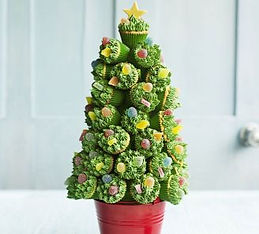
Cupcake Christmas tree
Prep: 1 hr, 40 mins
Cook: 24 mins
Makes 48 mini cakes and 1 tree
Bake to impress with this stunning edible centrepiece - perfect for a Christmas party buffet, or as an alternative to Christmas pudding
Ingredients
For the cupcakes
200g butter, softened
200g golden caster sugar
1 tsp vanilla extract
2 eggs
200g self-raising flour
2 tbsp milk
For the icing
300g butter
525g icing sugar
3 tsp vanilla extract
green food colouring
sweets, to decorate (we used Haribo Droppys and Waitrose jelly diamonds)
large white chocolate star, to decorate
edible gold spray
You will need
24-hole mini muffin tin
48 green mini-muffin or petit four cases
small plant pot or mini bucket (roughly 13cm across the top)
12cm foam cone (measured across base)
cocktail sticks
green paint
Method
1. Heat oven to 180C/160C fan/gas 4 and line the muffin tin with the muffin cases. Put half the butter, sugar and vanilla in a bowl, and beat until pale and fluffy. Add one egg and mix well. Add half the flour and milk, and mix with a spatula until combined. Use 2 teaspoons to distribute the cake mixture evenly among the cases and bake for 12 mins until risen and golden, and a skewer inserted to the centre comes out clean. Transfer to a wire rack to cool. Repeat to make another batch of 24 mini cakes.
2. While the cakes are cooling, make the icing. Put the butter and icing sugar in a bowl and beat until smooth. Add the vanilla and food colouring, and blend again until evenly coloured. Transfer the icing to a piping bag fitted with a small star nozzle. Once the cakes have cooled, use a skewer to make a small hole in the base of each cake. To decorate the cakes, pipe blobs of green icing over the surface of each one.
3. Now you’re ready to start assembling your Christmas tree. Paint the foam cone all over with green paint and leave to dry – don’t worry about it being too neat. Push the cone into the pot. To build the tree, push a cocktail stick into the base of each cake and press it into the cone. Continue until the cone is covered in cakes, trying to keep them as close together as possible. You may have some left over, which you can serve alongside the tree.
4. Spray the chocolate star gold and put on top of the tree, then decorate the rest of the tree with sweets. The cakes will last for 3 days.
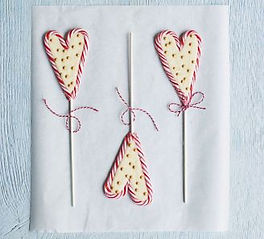
Candy cane lollipops
Prep: 10 mins
Cook: 5 mins
Makes 6
These pretty sweet treats take just 15 minutes to make from just three ingredients - perfect as a last-minute edible gift or stocking filler
Ingredients
12 peppermint candy canes
200g white chocolate, chopped
edible sprinkles (we used gold pearls from Dr Oetker)
You will need
6 ovenproof lolly sticks
cellophane bags and ribbons (if giving as a gift)
Method
1. Heat oven to 180C/160C fan/gas 4 and line 2 baking sheets with baking parchment. Arrange the candy canes in pairs on the trays, to make heart shapes. Put a lolly stick between each one, where they meet at the bottom. Put the trays in the oven and cook for 5 mins.
2. The candy canes should now be soft enough for you to carefully pinch together where they join at the top and the bottom, around the stick. Be careful as the canes will be extremely hot, but work quickly or they will set and you won’t be able to pinch them together.
3. Melt the chocolate in a pan over a bowl of barely simmering water, or in the microwave. Spoon the melted chocolate into the middle of the heart lollies, pushing it out to fill the spaces. Scatter over your choice of sprinkles, then leave to cool completely. When set, peel off the baking parchment, wrap in cellophane bags and tie with a ribbon to give as a gift.
Reindeer cake pops
Prep: 45 mins
plus chilling & setting
Easy
Makes 8
These chocolate cake lollipops are decorated in true festive fashion - have fun making them with the kids this Christmas.
Ingredients
150g chocolate cake
25g soft butter
50g icing sugar
25g plain chocolate
100g milk chocolate
small pretzels, broken into large 'antler' shape pieces
8 small jelly sweets, red chocolate beans or Smarties
2 tbsp royal icing coloured black or purchased black writing icing
Equipment
8 cake pop sticks and a polystyrene block to stand up the cake pops
Method
1. Crumble the cake into fine crumbs using your hands or in a food processor. Put into a bowl. In another bowl, beat together the butter and icing sugar until creamy.
2. Melt the plain chocolate in the microwave or in a bowl over a pan of barely simmering water. Add the melted chocolate to the butter mixture and combine well. Add this to the cake crumbs and mix thoroughly using your hands, until it sticks together. Divide the mixture into eight and shape each one into a smooth ball. Insert a cake pop stick, place on a tray lined with baking parchment and chill for at least 2 hours.
3. Melt the milk chocolate in the microwave or in a bowl over a pan of barely simmering water. Take a cake pop and dip in the chocolate. Shake gently until the excess has drained off. Push into a polystyrene block.
4. Make two holes in the top of the head and insert a pretzel 'antler' in each one. Press a sweetie nose onto the front and hold for a few seconds until attached. Repeat with all the other cake pops. Leave to set for about 20 mins and then using black icing, pipe on eyes and a mouth.

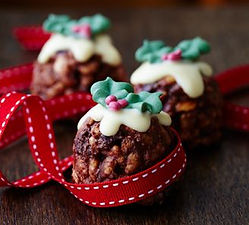
Christmas pudding Rice Krispie cakes
Prep: 30 hrs
Cook: 5 mins
plus chilling
Easy
Makes 10 - 12
Fun to make with kids or as a cute Christmas canape, top chocolate, peanut and raisin puffed rice cakes with white chocolate and festive holly icing.
Ingredients
50g rice pops (we used Rice Krispies)
30g raisin, chopped
50g butter
100g milk chocolate, broken into pieces
2 tbsp crunchy peanut butter
30g mini marshmallow
80g white chocolate
ready-made icing holly leaves (we used Sainsbury's Christmas cake decorations)
Method
1. Put the rice pops and raisins into a bowl. Put the butter, milk chocolate, peanut butter and marshmallows into a small saucepan. Place on a medium to low heat and stir until the chocolate and butter have melted but the marshmallows are just beginning to melt.
2. Pour onto the rice pops and stir until well coated. Line an egg cup with cling film. Press about a tablespoon of the mixture into the egg cup. Press firmly and then remove, peel off the cling film and place the pudding into a cake case, flat-side down. Repeat with the remaining mixture. Chill until firm.
3. Melt the white chocolate in the microwave or in bowl over a saucepan of barely simmering water. Spoon a little chocolate over the top of each pudding. Top with icing holly leaves.
Rudolph’s carrot patch cakes
Prep: 50 mins
Cook: 35 mins
Easy
Makes about 7
These chocolate carrot loaf cakes with edible vegetable decoration can be left as a present for Santa's reindeer - or enjoyed all year round
Ingredients
140g light soft brown sugar
100g self-raising flour
3 tbsp cocoa powder
¼ tsp bicarbonate of soda
½ tsp mixed spice
1 tsp ground cinnamon
zest 1 orange
2 medium egg
100ml sunflower oil
50ml milk
100g carrot (about 2 medium sized), grated
For the icing and to decorate
orange and green food colouring
140g fondant icing
100g butter, chopped
2 tbsp cocoa powder
200g icing sugar
2 tbsp milk
25g desiccated coconut
few parsley sprigs and edible green glitter (optional)
Method
1. Heat oven to 180C/160C fan/gas 4. Arrange 6 mini loaf cases (8 x 4 x 4cm) on a baking tray. In a large bowl, mix the sugar, flour, cocoa, bicarbonate of soda, spices, orange zest and ¼ tsp salt. In a jug, whisk the eggs, oil, milk and carrots. Pour the wet ingredients into the dry and mix thoroughly. Divide the mixture between the cases and bake for 30 mins until risen and cooked through. Transfer to a wire rack to cool.
2. While the cakes are cooking, make the carrot decorations. Mix the orange food colouring into the fondant icing until evenly coloured, then divide into 6 pieces. Roll each piece into a cyclinder, about 5cm long, then roll one end a little thinner to create a carrot shape. Use a cocktail stick to make indentations along the sides. Set aside, standing them on their fattest end, to firm up for 30 mins. Now make the chocolate icing. Put the butter, cocoa, icing sugar and milk into a saucepan, and bubble for a few mins, stirring with a small whisk until smooth and shiny. Set aside to cool for 20 mins. For the green coconut ‘grass’, tip the coconut into a small bowl, add a little green food colouring and mix until evenly coated.
3. To assemble the cakes, first cut a little hole, about 1cm, into the centre of each to ‘plant’ your carrot later. Stir the icing and spread over the cakes to cover the surface. Push your carrot into the centre, then scatter the green coconut around the edges. Stick a sprig of parsley into the top of each carrot and sprinkle the coconut grass with green edible glitter, if you like. Can be stored in a sealed cake tin for up to 3 days.

Jolly marshmallow snowmen
Prep: 40 mins
Easy
Makes 6
Young children will love making these marshmallow treats with liquorice, chocolate and icing decorations.
Ingredients
18 white marshmallow
250g ready-to-roll white fondant icing
18 strawberry laces
250g icing made from royal icing sugar
6 Pontefract cake
black writing icing
3 round black Liquorice Allsorts, halved
6 orange Tic Tacs
18 mini chocolate beans
24 mini white marshmallow
mini candy canes or pretzel sticks
roughly crushed sugar cube
Equipment
6 lolly or cake pop sticks
Method
1. Take one cake pop stick and thread on a marshmallow, narrow end on first. Thread on a second marshmallow, wide end on first so the the two wide ends meet in the middle. Thread a third marshmallow on sideways so the narrow round end makes the snowman's face.
2. Knead the white fondant icing and divide into 6. Shape each one into a rough mound and stick the snowmen into these bases.
3. Take three strawberry laces and twist together. Tie around a snowman's neck and then trim off the excess with scissors. Repeat for the other snowmen.
4. Using a little royal icing stick a Pontefract cake on each head. Using a little black writing icing, stick a Liquorice Allsort on top of each Pontefract cake.
5. Pipe on two eyes using black writing icing. Using royal icing, stick a Tic Tac on each face for a carrot nose. Stick mini chocolate beans on the bodies as buttons.
6. Using royal icing, stick four mini marshmallows on each snowman to represent arms. Stick a candy cane or pretzel stick to the end of one of each of the snowmen's arms, attaching the bottom end to the icing mound.
7. Take a little royal icing and thin with a few drops of water. Brush or dab on the base and sprinkle over the crushed sugar cubes. Leave to set.

Perky penguins
Prep: 40 mins
Easy
Children will love creating these chocolate penguins - the fruit pastilles and icing decorations add a fun wintery finish
Ingredients
3 jumbo chocolate button
150g icing made from royal icing sugar
3 walnut whips
100g chocolate flavour ready-to-roll fondant icing
3 red fruit pastilles (we used Tesco as they look like wooly hats)
1 orange fruit pastille
black writing icing
Method
1. Cut the jumbo chocolate buttons in half and place together in pairs, rounded sides touching, to make feet. Snap the walnut off the top of the walnut whip and discard. Put a little royal icing on each pair of feet and stick a walnut whip on top.
2. Divide the fondant icing in three. Take one piece and roll out into a sausage that is fat in the middle and thin at both ends. Flatten the ends to make flippers. Place the sausage on top of the walnut whip and shape the fat middle section into a head. Leave the flippers to hang free at the sides.
3. To decorate, put the remaining royal icing into a piping or plastic bag and snip a tiny bit off the end. Pipe a circle on the front of each penguin. Pipe two dots for eyes. Pipe a circle on top of each head and stick on a fruit pastille. Pipe a blob on top for a bobble.
4. Carefully cut three triangular pieces from the orange fruit pastille and stick on the face. Using the black writing icing pipe black dots in the centre of each eye. Leave to set.

Christmas pudding cake pops
Prep: 1 hr, 30 mins - 1 hr, 50 mins
Cook: 20 mins
Moderately easy
Makes 10 cake pops
These lollipops are a fantastic festive treat for kids and make an impressive centrepiece too
Ingredients
200g Madeira cake
140g-160g white chocolate (see Tip)
1 orange, zest finely grated
To decorate
300g dark chocolate, 60-70% cocoa solids, broken into chunks
50g white chocolate, broken into chunks
sugar holly decorations or red and green writing icing
Method
1. Pulse the Madeira cake in a food processor until you have fine crumbs. Melt the white chocolate in a bowl over just simmering water or in the microwave. Stir the orange zest into the chocolate, then work the chocolate into the crumbs using your hands.
2. Form into 10 small truffle-sized balls, then roll gently in your palms to smooth the surface. Arrange the balls on a baking parchment-lined dinner plate. Refrigerate for 30 minutes to allow the mixture to set.
3. Melt the dark chocolate in a microwave or over a bowl of just simmering water. Dip a lolly stick into the melted chocolate about 1.5cm in and poke half way into a cake ball. Repeat with the remaining balls. Put them back on the plate. Return to the fridge for five minutes.
4. Dip the cake pops one at a time into the melted chocolate, allowing any excess chocolate to drip off and spin the pops to even out the surface. Poke the pops into a piece of polystyrene or cake pop holder if you have one, keeping the pops apart. Allow to set for about half an hour.
5. Heat the white chocolate in a microwave or over a pan of simmering water. Allow to cool for a few minutes until it has a thick, runny consistency. If the chocolate is too hot, it will melt the dark chocolate underneath. Spoon a small amount on top of the cake pops, tip them back and forth so it runs down the sides a little. If you have holly decorations, pop one on the top of each pop. If using writing icing, wait for another 20 minutes or so until the white chocolate has set. Pipe on holly leaves with the green icing and two little dots for berries using the red.

Rudolph cupcakes
Prep: 35 mins
Cook: 30 mins
Plus cooling
Easy
Makes 12
Get the kids into the kitchen to decorate these individual chocolate sponges with frosting and sweets
Ingredients
200g butter, cubed
200g plain chocolate, broken into squares
200g light soft brown sugar
2 large egg, beaten
1 tsp vanilla extract
250g self-raising flour
For the icing
200g plain chocolate, broken into squares
100ml double cream, not fridge-cold
50g icing sugar
For the reindeers
12 large milk chocolate button (we used Cadbury Dairy Milk Giant Buttons)
24 white chocolate button
12 red Smarties
black icing pens
mini pretzels, carefully cut in half horizontally
Method
1. Get started: Heat oven to 160C/140C fan/gas 3. Line a 12-hole muffin tin with paper cases. Gently melt the butter, chocolate, sugar and 100ml hot water together in a large saucepan, stirring occasionally. Set aside to cool a little while you weigh the other ingredients.
2. Make your cakes: Stir the eggs and vanilla into the chocolate mixture. Put the flour in a large mixing bowl, and stir in the chocolate mixture until smooth. Spoon into the cases until just over three-quarters full. Bake on a low shelf in the oven for 20-22 mins. Leave to cool.
3. Ice the tops: To make the icing, melt the chocolate in a heatproof bowl over a pan of barely simmering water. Once melted, turn off the heat, stir in the double cream, sift in the icing sugar and mix well. When spreadable, top each cake with some icing.
4. Have fun decorating: Position a milk chocolate button on top of each cake, then 2 white chocolate buttons above it. Use a little icing as glue to stick a red Smartie onto the milk chocolate button for a nose. Then use your icing pens to draw black dots on the white buttons for eyes. Stick 2 pretzel top halves into the top of each cake for antlers, and stick the bottom half of a pretzel under the Smartie for a mouth. These cakes will keep in a sealed container for up to 3 days, but we doubt they’ll last that long!

Snow-capped fairy cakes
Prep: 25 mins
Cook: 20 mins
Moderately easy
Makes 18
Mary Cadogan’s fairy cakes are a treat for the whole family and they really do taste as good as they look
Ingredients
175g butter
175g golden caster sugar
3 eggs
200g self-raising flour
finely grated zest 1 orange
1 tsp vanilla extract
4 tbsp milk
For the icing
1 egg white
4 tbsp orange juice
175g icing sugar
fruit jellies and silver balls, to decorate
Method
1. Heat oven to 190C/fan 170C/gas 5. Line 18 holes of a 2 x 12-hole bun tins with paper cake cases. Melt butter and cool for 5 mins, tip into a large bowl with all the cake ingredients, then beat together for 1-2 mins until smooth.
2. Spoon the cake mixture into the cake cases, filling them three-quarters full (a heaped tablespoon is about right). Bake for 15-18 mins until lightly browned and firm to the touch. Cool on a wire rack.
3. To make the icing, put the egg white and orange juice into a heatproof bowl, sift in the icing sugar, then set over a pan of simmering water. Using an electric hand whisk, whisk the icing for 7 mins until it is glossy and stands in soft peaks. Remove from the heat, then whisk for a further 2 mins until it is slightly cooled.
4. Thinly slice the fruit jellies. Spoon the icing onto the cakes, swirling it with a knife, then decorate with slices of jelly fruits and a few silver balls. Leave to set. The cakes will keep for up to 3 days in the cake tin.

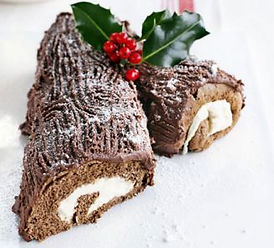
Yummy chocolate log
Prep: 30 mins
Cook: 10 mins
Moderately easy
Serves 8
A Christmas treat the kids will enjoy helping to make, with an unusual minty filling
Ingredients
For the cake
3 egg
85g golden caster sugar
85g plain flour (less 2 tbsp)
2 tbsp cocoa powder
½ tsp baking powder
For the filling & icing
50g butter
140g dark chocolate, broken into squares
1 tbsp golden syrup
284ml pot double cream
200g icing sugar, sifted
2-3 extra-strong mint, crushed (optional)
icing sugar and holly sprigs to decorate - ensure you remove the berries before serving
Method
1. Heat oven to 200C/fan 180C/gas 6. Grease and line a 23 x 32cm Swiss roll tin with baking parchment. Beat the eggs and sugar together with an electric whisk for about 8 mins until thick and creamy.
2. Mix the flour, cocoa and baking powder together, then sift onto the egg mixture. Fold in very carefully, then pour into the tin. Now tip the tin from side to side to spread the mixture into the corners. Bake for 10 mins.
3. Lay a sheet of baking parchment on the work surface. When the cake is ready, tip it onto the parchment, peel off the lining paper, then roll the cake up from its longest edge with the paper inside. Leave to cool.
4. To make the icing, melt the butter and chocolate together in a bowl over a pan of hot water. Take from the heat and stir in the syrup and 5 tbsp cream. Beat in the icing sugar until smooth. Whisk the remaining cream until it holds its shape. Unravel the cake, spread the cream over the top, scatter over the crushed mints, if using, then carefully roll up again into a log.
5. Cut a thick diagonal slice from one end of the log. Lift the log on to a plate, then arrange the slice on the side with the diagonal cut against the cake to make a branch.
6. Spread the icing over the log and branch (don’t cover the ends), then use a fork to mark the icing to give the effect of tree bark. Scatter with unsifted icing sugar to resemble snow, and decorate with holly.
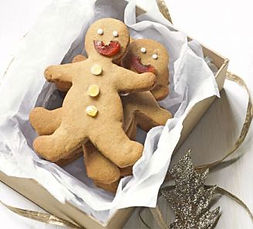
Double ginger gingerbread men
Prep: 45 mins
Cook: 15 mins
Easy
Makes 12 big gingerbread men
Even the smallest hands can help make these friendly little fellows made with a versatile gingerbread recipe
Ingredients
140g unsalted butter
100g dark muscovado sugar
3 tbsp golden syrup
350g plain flour
1 tsp bicarbonate of soda
2 tsp ground ginger and 1 tsp ground cinnamon
pinch of cayenne pepper (optional)
2 balls stem ginger from a jar, chopped
To decorate
50g icing sugar
a few glacé cherries (we used undyed)
2 balls stem ginger
Method
1. Heat oven to 200C/180C fan/gas 6. Line 2 baking sheets with baking parchment. Melt butter, sugar and syrup in a pan. Mix flour, soda, spices and a pinch of salt in a bowl. Stir in the butter mix and chopped ginger to make a stiff-ish dough.
2. Wait until cool enough to handle, then roll out dough to about 5mm thick. Stamp out gingerbread men, re-rolling and pressing the trimmings back together and rolling again. Lift onto baking sheets. Bake for 12 mins until golden. Cool 10 mins on the sheets, then lift onto cooling racks.
3. To decorate, mix icing sugar with a few drops of water until thick and smooth. Halve then slice cherries thinly to make smiles, and cut ginger into small squares. Spoon icing into a food bag, snip off the tiniest bit from one corner, then squeeze eyes and buttons, and a tiny smile onto 1 man at a time. Stick on a cherry smile and ginger buttons. Repeat; leave to set. Will keep up to 1 week in an airtight tin.